Introduction:
An API gateway allows you to add a dedicated orchestration layer on top of your backend APIs and services to help you separate orchestration from implementation concerns. You can then leverage the governance capabilities of API Manager to apply, among other capabilities, throttling, security, caching, and logging to your APIs.
Anypoint Platform offers three different gateway options for managing and securing your APIs.

Mule Gateway: Mule Runtime includes an embedded API Gateway. Using this gateway, any user can, for example, apply a basic authentication policy on top of a Mule application or enrich an incoming/outgoing message, without having to write any code.
Anypoint Service Mesh: Anypoint Service Mesh enables you to extend Anypoint Platform API Management capabilities to your Istio service mesh through the deployment of a Mule Adapter. Once installed, you can manage and secure your distributed applications running within your Istio service mesh seamlessly from a single pane.
Flex Gateway: Anypoint Flex Gateway is an ultrafast API gateway designed to manage and secure APIs running anywhere. Built to seamlessly integrate with DevOps and CI/CD workflows, Anypoint Flex Gateway delivers the performance required for the most demanding applications and microservices while providing enterprise security and manageability across any environment.
Universal API Management
With Universal API Management the MuleSoft Anypoint Platform now offers new and updated features as
- CLI- Automatic catalog creation in Exchange using the CI/CD plugin regardless of API origin
- Flex Gateway- Secure and Manage APIs
- API Manager- Manage users and services
- API Governance- Enforce development standards to ensure the quality and reusability of APIs
- Experience Hub- Exposing a digital marketplace for customers to explore and view the capabilities of both mule and non-mule APIs
Flex Gateway
The Flex Gateway is solving the problem of applying the right level of user access and authorization to different customers and between APIs during communication by applying the right policies. The APIs here can be developed using any architecture or programming language and could be deployed onto any platform/environment- OS/ Containerized, and in any location.
Anypoint Flex Gateway is MuleSoft’s new ultra-fast gateway designed to manage and secure APIs running anywhere. The gateway is built to deliver the performance required for the most demanding applications while providing enterprise-grade security and management.
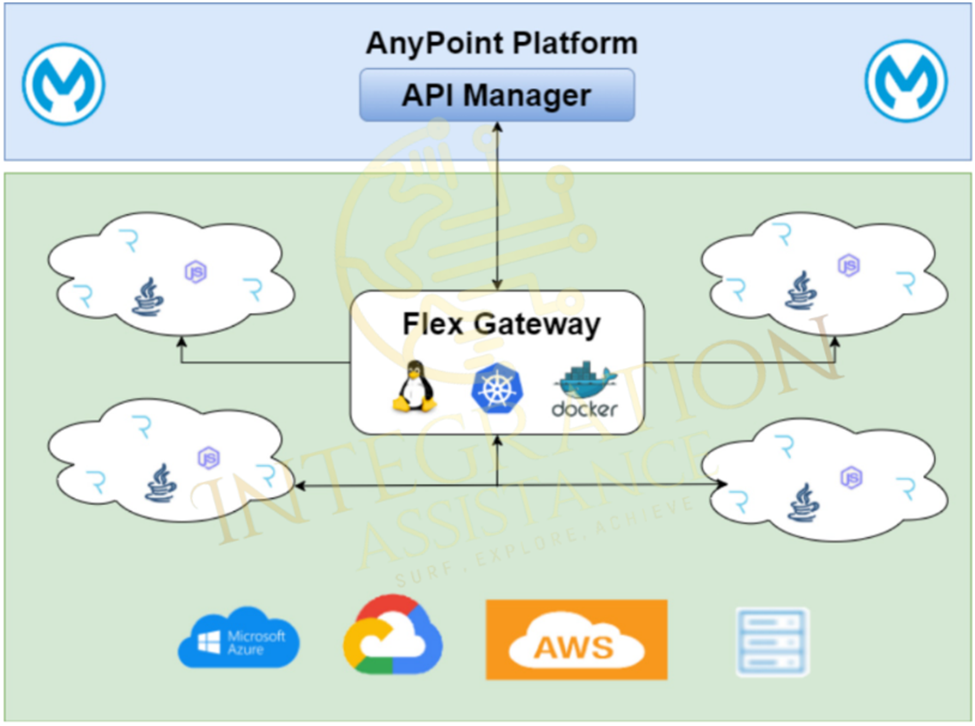
Anypoint Flex Gateway is a performant API gateway that can secure both Mule and non-Mule APIs. It is easily integrated into CI/CD workflows while offering enterprise security and manageability. It can be run on a public cloud or on-prem.
You can run Flex Gateway in two different modes:
- Connected Mode: Run Flex Gateway in Connected Mode if you want it fully connected to the Anypoint control plane for centralized management, observability, and security.
- Local Mode: Run Flex Gateway in Local Mode if you want to run it mostly disconnected from the Anypoint control plane and manage it with locally stored declarative configuration files.
Add Flex Gateway
There are three options to create flex gateway.
- Linux
- Docker
- Kubernetes
Flex Gateway Setup Using Docker
Note – Go to the Anypoint Run time Manager -> Flex Gateway -> Add Gateway -> Select the OS or Environment -> Copy the command for Install / Register
Installation: Retrieve the public package keys, add the package repository, update the package list, and install the package via the following commands:

Registration: Run the following command to register your Flex Gateway to Anypoint Platform, after replacing <gateway-name> with your own value.

After you have executed the command, you should see your new Flex Gateway in Runtime Manager after clicking Flex Gateway in the left navigation.
You should also see three new files where you executed the command, like the following:

Determine the path for these files, then save the path and the UUID, or name, of the files. Then update the permissions of the files:

Configuration Folder: Create a folder with name as UUID shown as above and move all above configuration files to this folder.

Start the Flex Gateway


Afterward, copy and paste the following content into the env.conf file, replacing the path and the UUID in the name of the .conf file with the path and the UUID of the .conf file created during registration.

Before running the Flex Gateway, we can monitor the runtime manager -> Flex Gateway. It should be available and status will be disconnected as below:

Finally, start the service using the following command:

Status of Flex gateway

Verify the flex gateway: Once connected, your Flex Gateway will automatically appear as connected on the Flex Gateways page in Runtime Manager.
